Quantcast
Channel: sfeldman.NET

User Secrets, the human-readable version

$
0
0

enter image description here

When developing locally, there are many ways to store secrets locally without risk of receiving a GitHub notification about leaked keys and secrets. Environment variables, local files excluded from check-ins, user secrets with secret storage, etc. This post is about user secrets. If you have no experience with user secrets, this Microsoft article does a good job to go from zero to sixty in about 30 seconds.

User secrets work just fine. Except if you don't like to read and memorize the mapping between GUIDs to project names, you'll have difficulty understanding what projects have their secrets stored on the file system. Imagine this:

4bddaed0-75ba-464a-94f1-917236f36c35
174f8024-a077-4411-8adf-8523f610ef47
...

What project is 174f8024-a077-4411-8adf-8523f610ef47 exactly? You get the idea.

Unfortunately, the documentation only speaks about GUIDs as project identifiers. But what if I'd like an identifier that is human-readable and to match the project name? Not sure what about you, but for projects that require user secrets, I found those project names to be quite unique. That's an assumption. Right.

The good news - .csproj files properties are MSBuild properties. Looking at the user secret definition for a given project:

<PropertyGroup><TargetFramework>netcoreapp3.1</TargetFramework><UserSecretsId>174f8024-a077-4411-8adf-8523f610ef47</UserSecretsId></PropertyGroup>

UserSecretsId is a variable assigned a horrific GUID. Instead of that monstrous value, we could use our project name. For the sake of this post, I'll call it MyWonderfulProject. The section change to

<PropertyGroup><TargetFramework>netcoreapp3.1</TargetFramework><UserSecretsId>MyWonderfulProject</UserSecretsId></PropertyGroup>

Inspecting %APPDATA%\Microsoft\UserSecrets\ we'll find a folder called MyWonderfulProject with the secrets.json file. Great!

Now, a project might be renamed. If you really insist on not changing the value of the UserSecretsId property ever, that's possible as well. This is where reserved MSBuild properties are coming in handy. One of those variables is MSBuildProjectName. Let's use it.

<PropertyGroup><TargetFramework>netcoreapp3.1</TargetFramework><UserSecretsId>$(MSBuildProjectName)</UserSecretsId></PropertyGroup>

Et voilà! Now we have the following in the secrets store:

4bddaed0-75ba-464a-94f1-917236f36c35
MyWonderfulProject  <|-- Look! I know what project is using this folder!
...

This works with Visual Studio 2019 (Manage User Secrets). Unfortunately, Rider has no built-in support for user secrets, and .NET Core User Secrets plugin has a bug that doesn't allow using MSBuild variables.


Automatically create Service Bus trigger queue for Azure Function

$
0
0

header

Azure Functions are great. Take HTTP triggered Function. You make a request, it's passed into the Function code, the code is executed, and that's it. Simple. What does it take to deploy an HTTP-triggered function? Packaging and deploying it.

[FunctionName("HttpTriggerFunc")]
public async Task<IActionResult> Run(
    [HttpTrigger(AuthorizationLevel.Function, "get", "post", Route = null)]
    HttpRequest req, ILogger log)
{
    log.LogInformation("C# HTTP trigger function processed a request.");

    string name = req.Query["name"];

    return name != null
        ? (ActionResult)new OkObjectResult($"Hello, {name}")
        : new BadRequestObjectResult("Please pass a name on the query string");
}

If only all triggers were that simple. Let's take a queue triggered Function.

Let's write a function that is triggered by incoming messages on a queue called myqueue and logs its label to mimic the message's processing. Here's how the code would look like:

[FunctionName("ServiceBusQueueTriggerCSharp")]                    
public Task Run([ServiceBusTrigger("myqueue")] Message message, ILogger log)
{
    log.LogInformation($"Received message with label: {message.Label}");
    return Task.CompletedTask;
}

What does it take to deploy a Service Bus triggered function? Packaging and deploying it? Unfortunately not that simple. The queue that we'd like the function to be listening to has to be provisioned first. But to trigger the function the message has to arrive from that queue. This means it has to be there in the first place before the function even runs. A queue-triggered function will only execute if there's a message, i.e. a queue has to be there. That's sort of a chicken and egg situation.

The obvious solution is to provision the queue first and then deploy the function. While some even prefer this controlled infrastructure deployment, some prefer not to split the queue provision and the deployment of the function. I.e. have the function to create what's needed. What's gives?

Sometimes, a brute force approach is an approach to take. If you're using statically defined Functions, have a look at using the FunctionsHostBuilder approach. It enables the generic host approach and DI container use with Functions. It also opens up the option of executing an arbitrary code when setting up dependencies. And it runs before any trigger, upon function startup.

[assembly: FunctionsStartup(typeof(Startup))]
public class Startup : FunctionsStartup
{
    public override void Configure(IFunctionsHostBuilder builder)
    {
      // DI setup
    }
}

This is the spot that could be used to "hack" the provisioning of the necessary infrastructure! Adding a helper method to create the queue:

static async Task CreateTopology(IConfiguration configuration)
{
    var connectionString = configuration.GetValue<string>("AzureWebJobsServiceBus"); // this is the default connection string name
    var managementClient = new ManagementClient(connectionString);
    if (!await managementClient.QueueExistsAsync("myqueue"))
    {
        await managementClient.CreateQueueAsync("myqueue");
    }
}

All that's left is to call the helper method from the Configure class. Unfortunately, this would be calling an asynchronous helper method from a synchronous Configure method, which will require somewhat dirty implementation but hey, à la guerre comme à la guerre!

[assembly: FunctionsStartup(typeof(Startup))]
public class Startup : FunctionsStartup
{
    public override void Configure(IFunctionsHostBuilder builder)
    {
      CreateTopology(builder.GetContext().Configuration).GetAwaiter().GetResult();
    }
}

That's it. Now the function can be deployed, and no need to worry about queue deployment. The helper method is invoked once only when a function instance is created or scaled-out. A small price to pay to not worry about queue provisioning: the same approach can be applied to subscription-triggered functions.

Automatically provision NServiceBus Service Bus Function endpoint topology

$
0
0

enter image description here

In the previous post, Automatically create Service Bus trigger queue for Azure Function, I've shown how to provision a ServiceBusTrigger queue from within a Function.

In this post, we'll take that idea and push it further to something a bit more sophisticated - provisioning the topology necessary for NServiceBus endpoint hosted with Azure Function and using Azure Service Bus transport. If you haven't used NServiceBus or NServiceBus with Azure Functions, here's a starting point for you. NServiceBus can bring a few advantages over native Functions I'll leave to discover on your own. And now, let's have a look at what are the things we'll need to accomplish.

Just as with the native Azure Function, a logical endpoint is represented by an input queue. That input queue needs to be created.

Next, NServiceBus has centralized error and audit queues. While those are not difficult to create, it's more convenient to have those queues created by the first starting endpoint.

Last is the pub/sub infrastructure. Azure Service Bus transport has a specific topology all endpoints adhere to. That includes a centralized topic, by default named bundle-1 and each logical endpoint as a subscription. Upon startup, each endpoint subscribes to the events it's interested in using this infrastructure.

With this information, let's start putting the pieces needed for the whole thing to work together.

Discovering endpoints

As there might be one or more logical endpoints, the hard-coding queue name as it was done in the previous post is not ideal. An alternative would be to reflect the endpoint's name (queue name) at runtime when the Function App is bootstrapping everything.

    var attribute = Assembly.GetExecutingAssembly().GetTypes()
        .SelectMany(t => t.GetMethods())
        .Where(m => m.GetCustomAttribute<FunctionNameAttribute>(false) != null)
        .SelectMany(m => m.GetParameters())
        .SelectMany(p => p.GetCustomAttributes<ServiceBusTriggerAttribute>(false))
        .FirstOrDefault();

With this code, we'll discover all ServiceBusTriggerAttribute applied to Azure Service Bus triggered functions. For each of these attributes, we'll have to

  1. Create a queue if it doesn't exist
  2. Create a subscription if it doesn't exist

The caveat is that a subscription can only be created when a topic is found. Therefore a topic needs to be created first. Also, to make the topology work as the transport expects, each subscription should be auto-forwarding messages to the input queue it's associated with. And finally, the audit and error queues can be provisioned as well, completing the topology work necessary for each endpoint to be bootstrapped.

Putting it together

Here's the helper method we'd be using:

static async Task CreateTopologyWithReflection(IConfiguration configuration, string topicName = "bundle-1", string auditQueue = "audit", string errorQueue = "error")
{
    var connectionString = configuration.GetValue<string>("AzureWebJobsServiceBus");
    var managementClient = new ManagementClient(connectionString);

    var attribute = Assembly.GetExecutingAssembly().GetTypes()
        .SelectMany(t => t.GetMethods())
        .Where(m => m.GetCustomAttribute<FunctionNameAttribute>(false) != null)
        .SelectMany(m => m.GetParameters())
        .SelectMany(p => p.GetCustomAttributes<ServiceBusTriggerAttribute>(false))
        .FirstOrDefault();

    if (attribute == null)
    {
        throw new Exception("No endpoint was found");
    }

    // there are endpoints, create a topic
    if (!await managementClient.TopicExistsAsync(topicName))
    {
        await managementClient.CreateTopicAsync(topicName);
    }

    var endpointQueueName = attributes.First().QueueName;

    if (!await managementClient.QueueExistsAsync(endpointQueueName))
    {
        await managementClient.CreateQueueAsync(endpointQueueName);
    }

    if (!await managementClient.SubscriptionExistsAsync(topicName, endpointQueueName))
    {
        var subscriptionDescription = new SubscriptionDescription(topicName, endpointQueueName)
        {
            ForwardTo = endpointQueueName,
            UserMetadata = $"Events {endpointQueueName} subscribed to"
        };
        await managementClient.CreateSubscriptionAsync(subscriptionDescription);
    }

    if (!await managementClient.QueueExistsAsync(auditQueue))
    {
        await managementClient.CreateQueueAsync(auditQueue);
    }

    if (!await managementClient.QueueExistsAsync(errorQueue))
    {
        await managementClient.CreateQueueAsync(errorQueue);
    }
}

Next, this helper method needs to be involved in the Startup class:

[assembly: FunctionsStartup(typeof(Startup))]
public class Startup : FunctionsStartup
{
    public override void Configure(IFunctionsHostBuilder builder)
    {      
        CreateTopology(builder.GetContext().Configuration).GetAwaiter().GetResult();

        builder.UseNServiceBus(() =>
        {
          var configuration = new ServiceBusTriggeredEndpointConfiguration(AzureServiceBusTriggerFunction.EndpointName);
          configuration.Transport.SubscriptionRuleNamingConvention(type => type.Name);
          return configuration;
        });
    }
}

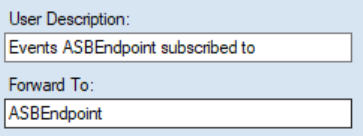
In my test solutions, I've defined an endpoint named ASBEndpoint (AzureServiceBusTriggerFunction.EndpointName is assigned the name). Once Azure Function hosting the endpoint is deployed, the following topology is created:

topology

with the correct forwarding to the input queue

fording

Subscribing to events

In the endpoint, I've added an event and event handler.

public class SimpleEvent : IEvent { }

public class SimpleEventHandler : IHandleMessages<SimpleEvent>
{
    readonly ILogger<SimpleEvent> logger;

    public SimpleEventHandler(ILogger<SimpleEvent> logger)
    {
        this.logger = logger;
    }

    public Task Handle(SimpleEvent message, IMessageHandlerContext context)
    {
        logger.LogInformation($"{nameof(SimpleEventHandler)} invoked");
        return Task.CompletedTask;
    }
}

NServiceBus automatically picks up and subscribes to all the events it finds handlers for. The subscription is expressed as a rule for each event. But this only happens when an endpoint is activated. This is not the case with message triggered Function endpoint. Luckily, there's a trick with TimerTrigger we can apply.

Timer trigger trick

Normally, TimerTirgger is executed periodically using a schedule defined using the CRON expression. In addition to that, there's also a flag to force a time-triggered function to run a single time when a timer triggered function is deployed. With this option, we can leverage a timer triggered function to run once upon deployment and stay dormant for a year. When the function executes, it will dispatch the ForceAutoSubscription control message and cause the endpoint to load and auto-subscribe to the SimpleEvent.

Control message definition:

public class ForceAutoSubscription : IMessage { }

Timer function:

public class TimerFunc
{
    readonly IFunctionEndpoint functionEndpoint;

    public TimerFunc(IFunctionEndpoint functionEndpoint)
    {
        this.functionEndpoint = functionEndpoint;
    }

    [FunctionName("TimerFunc")]
    public async Task Run([TimerTrigger("* * * 1 1 *", RunOnStartup = true)]TimerInfo myTimer,
        ILogger logger, ExecutionContext executionContext)
    {
        var sendOptions = new SendOptions();
        sendOptions.SetHeader(Headers.ControlMessageHeader, bool.TrueString);
        sendOptions.SetHeader(Headers.MessageIntent, MessageIntentEnum.Send.ToString());
        sendOptions.RouteToThisEndpoint();
        await functionEndpoint.Send(new ForceAutoSubscription(), sendOptions, executionContext, logger);
    }
}

Note: ForceAutoSubscription is a control message and will require a message handler to be defined, nor will it cause recoverability to be executed.

The final result is what we needed. The endpoint is subscribed to SimpleEvent, and it's part of the topology. This means there's a rule under the endpoint's subscription.

event-subscription

Summary

With this in place, we can bootstrap NServiceBus Function hosted endpoint using Azure Service Bus transport (preview 0.5 and later) w/o the need to manually provision the topology.

P.S.: if you're interested in Azure Functions supporting an opt-in queue creation, here's a feature request you could upvote.

Azure Functions Elevated

$
0
0

A recent talk I gave online at ServerlessDays Amsterdam

Azure Functions Isolated Worker - Sending multiple messages

$
0
0

enter image description here

The new Azure Functions SDK for Isolated Worker (process) has been introduced around .NET 5. While it's still in flux despite being GA-ed, it's gaining more and more popularity. And yet, there are still some sharp edges you should be careful with and validate that everything you're using with the older SDK, In-Process, is offered with the new SDK. Or at least there's a replacement.

Today, I've stumbled upon a StackOverflow question about IAsyncCollector and Service Bus messages. IAsyncCollector, as its synchronous counterpart ICollector offers the comfort of output binding and returning multiple items. For example, with Azure Service Bus, one can send out multiple messages from the executing function. Quite handy, and with the In-Process SDK, it looks like the following. The function's signature contains a collector (I call it dispatcher) that can be used to "add" messages. Those are actually getting dispatched to the queue the ServiceBus attribute is configured with by adding messages. Which, in this case, is a queue called dest.

[FunctionName("Concierge")]
public async Task<IActionResult> Handle([HttpTrigger(AuthorizationLevel.Function,"post", Route = "receive")] HttpRequest req,
    [ServiceBus("dest", Connection = "AzureServiceBus")] IAsyncCollector<ServiceBusMessage> dispatcher)

And sending messages:

for (var i = 0; i < 10; i++)
{
   var message = new ServiceBusMessage($"Message #{i}");
   await collector.AddAsync(serviceBusMessage);
}

Straight forward and simple. But how do you do the same with the new Isolated Worker (out of process) SDK?

Not the same way. The new SDK doesn't currently support native SDK types. Therefore types such as ServiceBusMessage are not supported. Also, SDK Service Bus clients are not available directly. So functions need to marshal data as strings or byte arrays to be able to send those. And receive as well. But we're focusing on sending. So what's the way to send those multiple messages?

The official documentation does mention multiple output binding. But that's in the context of using multiple different output bindings. To output multiple items to the same output binding, we need to resort to a bit of tedious work.

First, we'll need to serialize our messages. Then we'll dispatch those serialized objects using an output binding, connected to a collection property. Here's an example:

[Function("OneToMany")]
public static DispatchedMessages Run([ServiceBusTrigger("myqueue", 
    Connection = "AzureServiceBus")] string myQueueItem, FunctionContext context)
{
  // Generate 5 messages
  var messages = new List<MyMessage>();
  for (var i = 0; i < 5; i++)
  {
      var message = new MyMessage { Value = $"Message #{i}" };
      messages.Add(message);
  }

  return new DispatchedMessages
  { 
      Messages = messages.Select(x => JsonSerializer.Serialize(x)) 
  };
}

Each message of type MyMessage is serialized first.

class MyMessage
{
    public string Value { get; set; }
}

And then, we return an object of DispatchedMessage where the binding glue is:

public class DispatchedMessages
{
    [ServiceBusOutput(queueOrTopicName: "dest", Connection = "AzureServiceBus")]
    public IEnumerable<string> Messages { get; set; }
}

This object will be returned from the function and marshalled back to the SDK code that will take care to enumerate over the Messages property, taking each string and passing it as the body value to the newly constructed ServiceBusMessage. With the help of the ServiceBusOutput attribute, Functions SDK knows where to send the message and where to find the connection string. Note that w/o specifying the connection string name, the SDK will attempt to load the connection string from the variable/key named AzureWebJobsServiceBus. This means that we can have multiple dispatchers, similar to the in-process SDK multiple collectors, by having a property per destination/namespace on the returned type.

And just like this, we can kick off the function and dispatch multiple messages with the new Isolated Worker SDK.

enter image description here

Service Bus Message to Blob

$
0
0

About 5+ years ago I blogged about turning messages into audit blobs. Back then, it was for Storage Queue messages and the early Azure Functions implementation that required portal configuration. Since then, Storage Queues has been replaced by Azure Service Bus and Azure Functions has gained the ability to declare everything through the code. And not only that but also in two different ways, using

  1. In-Process SDK
  2. Isolated Worker SDK (out-of-process)

The concept hasn't changed much but the the code did become somewhat simpler.

In-Process SDK

public static class MessageTriggeredFunction
{
    [FunctionName(nameof(MessageTriggeredFunction))]
    public static async Task Run(
        [ServiceBusTrigger("myqueue", Connection = "ServiceBusConnectionString")]string payload,
        string messageId,
        [Blob("messages/{messageId}.txt", FileAccess.Write, Connection = "StorageAccountConnectionString")] Stream output)
    {
        await output.WriteAsync(Encoding.UTF8.GetBytes(payload));
    }
}

Isolated Worker SDK

public class MessageTriggeredFunctionIsolated
{
   [Function(nameof(MessageTriggeredFunctionIsolated))]
   [BlobOutput("messages/{messageId}.txt", Connection = "StorageAccountConnectionString")]
   public string Run(
       [ServiceBusTrigger("myqueue", Connection = "ServiceBusConnectionString")] string payload,
       string messageId)
  {
            return payload;
  }
}

The two snippets will result in the same outcome - a message will trigger the function and cause a blob to be generated and named as message-id.txt where message-id will be the physical message id.

Executing Azure Timer function manually

$
0
0

enter image description here

Azure timer triggered. Functions are convenient for automated execution. With the specified time interval, a function gets to execute when specified and then sleeps until the subsequent execution.

But what happens when a function needs to be executed on demand? For example, during development, when debugging the logic and want to kick off a function right away rather than waiting?

That's possible with the TimerTrigger that accepts an additional parameter, RunOnStartup. Assign it a value of true, and the function will be executed when the Function App starts. You might want to wrap it with #if DEBUG to ensure it gets executed upon each deployment or restarting a Function/Function App in production.

[FunctionName(nameof(MyTimerTrigger))]
public async Task RunAsync([TimerTrigger("0 0 */12 * * *"
#if DEBUG
  , RunOnStartup = true
#endif
)] TimerInfo myTimer, ExecutionContext executionContext)
{
 // function code
}

That's great, but what if I need to force the function to execute not right away? For example, my function executes every 12 hours ("0 0 */12 * * *"), and I need to force it to run earlier than that?

One way is to use the CRON expression from a configuration, update the configuration and restart the Function. But that's clunky and inconvenient. A better way is to force the function to execute by making a request through the administrative API.

An HTTP request to the administrative API with a master key will trigger the function execution. The URL is always of the following format:

https://<function-app>.azurewebsites.net/admin/functions/<function-name>

For example, https://my-test-funcapp.azurewebsites.net/admin/functions/MyTimerTrigger

The content to POST-ed for a timer-triggered function can be an empty JSON, "{}". The master key can be found under the Function App Keys section. Careful with the value, do not share or commit it. The value should be passed with the header x-functions-key.

Note: locally, the x-functions-key header is not required.

Upon successful execution, HTTP response code 202 Accepted will be returned.

Conveniently enough, this works on any non-HTTP triggered function and on v3 and v4 In-Process SDK and Isolated Worker SDK.

While this little gem is documented, it deserves more publicity it brings some excellent options to the table when it comes to invoking non-HTTP functions on demand.

Impersonating Events

$
0
0

enter image description here

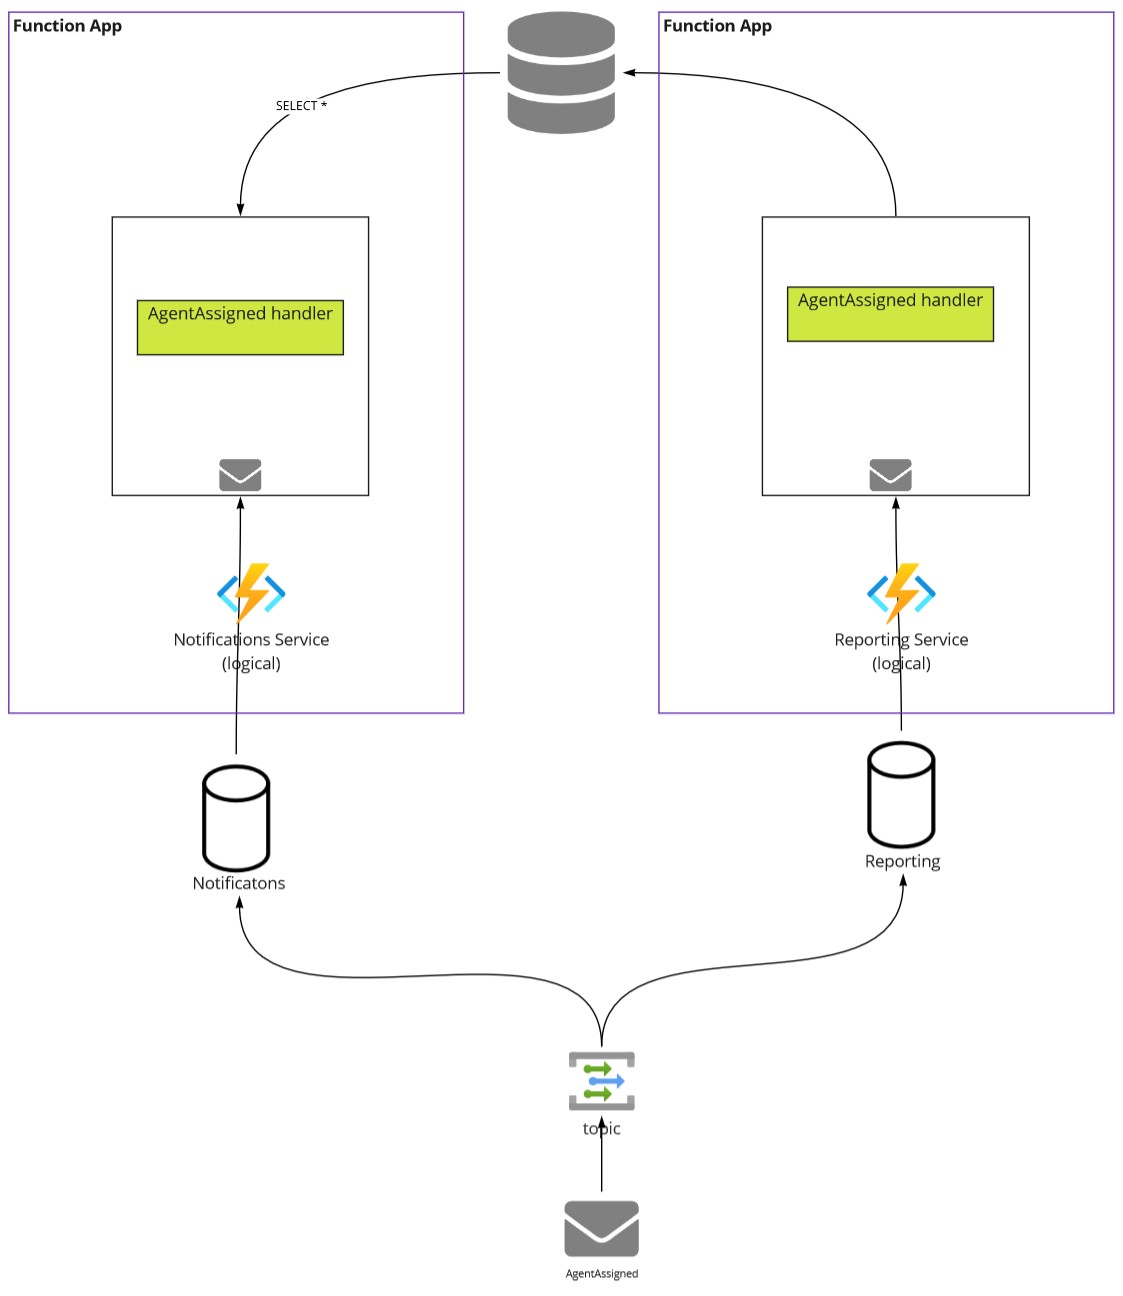
Azure Service Bus queues and subscriptions are an excellent way to process messages using competing consumers. But it can also get really tricky. Let's look at a scenario where a single event needs to be processed by two services. For this example, I'll use a process of an agent being assigned to a case. The requirement is pretty straightforward. When an agent is assigned to a case, we should send an email notifying the agent. In my system, I've designed it the way that when the event of assignment (AgentAssigned) is taking place, there are two event handlers that would react to it:

  1. Update the querying data store with the information about the assignment to be able to look up agent assignments, and
  2. Notify the agent about the assignment with some case details.

enter image description here

It's all great except for one problem. When the second handler runs first, there's still no association between the agent and the case. No email can go out as there's nothing to notify about. Or worse, when another event, AgentReassigned, took place but hasn't been processed by the first handler. In this case, we'd be sending an email notification to the original agent who's no longer on the case. The problem is quite apparent - we can't have competing consumers for the same event. And the order of execution is clearly essential.

One of the solutions is to introduce an additional event, AgentAssignedCompleted, which would be triggered by the first handler when the querying data store is updated with the information about the case and the agent. And have the second handler subscribe to this new event rather than the original one.

But what if I have more than one event to notify about where I shouldn't have competing consumers? And the original event would need to be duplicated as-is as the same information would be required. I really don't want to do that. The good news is there's no need. Azure Service Bus is robust enough to allow message impersonation. How does it work?

The first handler, upon its completion, will dispatch a new event. We'll use a convention of {OriginalMessageType}Completed. In the case of AgentReassigned, the newly dispatched event will be AgentAssignedCompleted. But what we'll do is stamp the new message headers with the original message type and set the payload to the original message payload.

var outgoingMessage = new ServiceBusMessage(BinaryData.FromObjectAsJson(message))
{
	ApplicationProperties =
	{
		{ "EventType", $"{nameof(ConsultantReassigned)}Completed" },
		{ "OriginalEventType", typeof(ConsultantReassigned).FullName }
	}
};
await sender.SendMessageAsync(outgoingMessage);

The subscription we'll create for the 2nd handler will subscribe to the AgentAssignedCompleted event type, using SQL filter EventType='ConsultantReassignedCompleted'. This will ensure that copies of the messages of ConsultantReassignedCompleted will be stored under the subscription.

And here's the trick, we'll use SQL filter actionto replace EventType of the message that will be given to the subscription if it matches the condition, back to the original message type using the following instruction: SET EventType=OriginalEventType; REMOVE OriginalEventType;. With this action, any message that has satisfied the SQL filter will have its header EventType modified to the header's value OriginalEventType, removing the temporary OriginalEventType after that.

When the 2nd handler receives messages from this subscription, the type of the message indicated by EventType will be the original ConsultantReassigned event rather than the modified ConsultantReassignedCompleted type. And the payload will be the original ConsultantReassigned payload.

enter image description here

Provisioning

There are several ways. Manually, using a tool such as ServiceBus Explorer, or scripted using Az CLI or Bicep. Bicep seems to have a bug, but Az CLI works great. This is what it would look like:

az servicebus topic subscription rule create --resource-group 'MyGroup' --namespace-name 'MyNamespace'
    --topic-name 'tva.events' --subscription-name 'Notifications' --name ConsultantReassignedCompleted
    --filter-sql-expression="EventType='ConsultantReassignedCompleted'" 
    --action-sql-expression='SET EventType=OriginalEventType; REMOVE OriginalEventType;'

Is this necessary?

It really depends. You could create Additional xxxxCompleted types and duplicate all the properties from the original message types if you'd like. We can skip that and keep only the original events that matter, enabling ordered processing by tweaking the provisioned topology with event impersonation.


Sagas with Azure Service Bus

$
0
0

Introduction

Handling messages out of order is always tricky. The asynchronous nature of messaging makes it challenging. On top of that, systems in the real world are messy and unpredictable. That's why handling workflows always brings more complexity than just handling messages. To illustrate the challenge, I'll use a scenario where my workflow depends on two different services.

  1. Payments
  2. Shipping

To successfully complete an order, I'll need to handle a message from each service. PaymentAccepted from the Payments service and ItemShipped from the Shipping service. The order can be considered successfully completed only when the two messages are received. The absence of one of the messages would indicate a failed state and require a compensating action. The compensating action will depend on which one of the two messages has already been handled. I'll leave the details of the compensating action out of this post to keep it somewhat light.

Setting the expectations

One of the assumptions I'll make is how we handle a given order. Both the payment and the shipping services would need to use a correlation ID to connect the things together. This could be an order ID that should be unique. Another assumption is how to handle messages out of order over time. This is where the saga pattern. An important aspect to note is that it will require persisting the state because we'll deal with time. And while we could leverage an external storage/database service with Azure Service Bus, this is unnecessary, thanks to a feature called Message Sessions. While Message Sessions is more commonly used for FIFO scenarios where the message processing order has to be the same as the message sending order, my choice of Message Sessions was not driven by that. An additional property of the Message Sessions feature that is frequently overlooked is the ability to have a state associated with a given session. The state is an arbitrary object kept on the broker and associated with the session ID. The state can event exist w/o any messages for the session being around. This session state can be accessed by the session ID and can hold up to a single message size of data.

Implementation

With all this in mind, let's get to the implementation. Each of the two services, as mentioned above, will post a message. The messages will always indicate the order ID as a correlation ID and set the message's SessionId to this value. I'll use a specific GUID as the order ID and store it in a shared project under Correlation.Id to make the demo simple.

public static class Correlation
{
    public const string Id = "77777777-0000-0000-0000-000000000000";
}

To mimic the real world where messages can come out of order and at different times, the Shipping service will post a message with a delay.

await publisher.ScheduleMessageAsync(new ServiceBusMessage("Shipping OK")
{
    SessionId = Correlation.Id,
    ApplicationProperties = { { "MessageType", "ItemShipped" } },
}, DateTimeOffset.Now.Add(TimeSpan.FromSeconds(7)));

Notice the MessageType header. I'll use topics and subscriptions, filtering out messages based on the MessageType header. Similar code but without delay will be published an even from the Payments service.

await publisher.SendMessageAsync(new ServiceBusMessage("Payment OK")
{
    SessionId = Correlation.Id,
    ApplicationProperties = { { "MessageType", "PaymentAccepted" }  }
});

When these two are executed, PaymentAccepted will be delivered right away and ItemShipped after 7 seconds. And now to the saga implementation that will handle these messages coming out of order at different times and the option that not always both messages will make it.

Saga implementation

As mentioned earlier, the saga will be implemented using Message Sessions. To process session messages, the SDK provides a SessionProcessor. To see messages flow in a way that is easier to digest, I'll set the number of sessions to handle to 1. Of course, we'd not want to handle a single session but instead multiple sessions in the real world.

var options = new ServiceBusSessionProcessorOptions
{
    MaxConcurrentSessions = 1,
    MaxConcurrentCallsPerSession = 1,
    SessionIdleTimeout = TimeSpan.FromSeconds(15)
};
var processor = client.CreateSessionProcessor(topicName: "orchestration", subscriptionName: "orchestrator", options);

Not that I'm using a topic and a subscription. You could also use a queue or some other topology. Here's how I've arranged my topology for this demo:

orchestration (topic)
│
└────orchestrator (subscription)
     │
     ├────ItemShipped (rule)
     │
     ├────PaymentAccepted (rule)
     │
     └────Timeout (rule)

Notice the Timeout rule. This will be needed whenever we are waiting for the arrival of the missing messages. Timeouts will be our postponing of saga execution until either all messages will be handled or we'll reach the condition where no more waiting can occur. Then, a compensating action has to be executed as we've given up.

A session has several lifecycle events that can take place. Those are:

processor.SessionInitializingAsync += args =>
{
    WriteLine($"Handling session with ID: {args.SessionId}");
    return Task.CompletedTask;
};

processor.SessionClosingAsync += args =>
{
    WriteLine($"Closing session with ID: {args.SessionId}");
    return Task.CompletedTask;
};

processor.ProcessErrorAsync += args =>
{
    WriteLine($"Error: {args.Exception}", warning: true);        
    return Task.CompletedTask;
};

And the important one, ProcessMessageAsync. Again, it's a bit overwhelming, so give it a quick look and head over to the explanation below.

processor.ProcessMessageAsync += async args =>
{
    // (1)
    var message = args.Message;
    var messageType = message.ApplicationProperties["MessageType"];
    WriteLine($"Got a message of type: {messageType} for session with ID {args.SessionId}");

    // (2)
    var sessionState = await args.GetSessionStateAsync();
    var state = sessionState is null
        ? new State()
        : sessionState.ToObject<State>(new JsonObjectSerializer())!;

    // (3)
    if (state.Completed)
    {
        WriteLine($"Completing the process for Order with correlation ID {message.SessionId}");

        var publisher = client.CreateSender("orchestration");
        await publisher.SendMessageAsync(new ServiceBusMessage($"Orchestration for Order with session ID {message.SessionId} is completed"));
    }

    Func<State, Task> ExecuteAction = messageType switch
    {
        // (4)"PaymentAccepted" => async delegate
        {
            state.PaymentReceived = true;
            await SetTimeoutIfNecessary(client, args, state, TimeSpan.FromSeconds(5));
        },"ItemShipped" => async delegate
        {
            state.ItemShipped = true;
            await SetTimeoutIfNecessary(client, args, state, TimeSpan.FromSeconds(5));
        },
        // (5)"Timeout" => async delegate
        {
            if (state.Completed || sessionState is null)
            {
                WriteLine($"Orchestration ID {args.SessionId} has completed. Discarding timeout.");
                return;
            }
            if (state.RetriesCount < 3)
            {
                await SetTimeoutIfNecessary(client, args, state, TimeSpan.FromSeconds(5));
            }
            else
            {
                WriteLine($"Exhausted all retries ({state.RetriesCount}). Executing compensating action and completing session with ID {args.SessionId}", warning: true);
                // Compensating action here
                await args.SetSessionStateAsync(null);
            }
        },
        _ => throw new Exception($"Received unexpected message type {messageType} (message ID: {message.MessageId})")
    };

    await ExecuteAction(state);

    static async Task SetTimeoutIfNecessary(ServiceBusClient client, ProcessSessionMessageEventArgs args, State state, TimeSpan timeout)
    {
        if (state.Completed)
        {
            WriteLine($"Orchestration with session ID {args.SessionId} has successfully completed. Sending notification (TBD).");
            await args.SetSessionStateAsync(null);
            return;
        }

        WriteLine($"Scheduling a timeout to check in {timeout}");

        var publisher = client.CreateSender("orchestration");
        await publisher.ScheduleMessageAsync(new ServiceBusMessage
        {
            SessionId = args.Message.SessionId,
            ApplicationProperties = { { "MessageType", "Timeout" } }
        }, DateTimeOffset.Now.Add(timeout));

        state.RetriesCount++;
        await args.SetSessionStateAsync(BinaryData.FromObjectAsJson(state));
    }
}

What this code is doing is the following:

  1. Upon a received message, it looks at the message type and the session state.
  2. Session state is the saga state. If one doesn't exist, a new state is initiated. Otherwise, it's deserialized into the POCO to be used for the logic. The state keeps the vital information for the decision-making that needs to survive over the time between the messages.
  3. If the state indicates completion (both messages received), notify about the successful completion of the saga. The underlying session will be completed eventually.
  4. If the message is PaymentAccepted, the state is updated to indicate this message has been handled. And right away, a timeout is set, if necessary.
  5. If the message is Timeout, the state is checked for completion (meaning PaymentAcceptedandItemShipped where received), or if the session state is null, telling the saga is over. If that's the case, the timeout message will be discarded as it has arrived after the saga has been completed. Otherwise, a simple number of retries will be checked to determine wherever the saga should continue waiting or not. This part is very custom, and I've decided to let the saga issue a timeout of 5 seconds for 3 times. You could do it exponentially or introduce different types of timeouts. But if the number of retries has been exceeded, we've never got one of the missing messages, and the saga has not been completed successfully. This is where a compensating action would occur, and the session state would be cleared. It's crucial to remove the session state to ensure it doesn't stay on the broker forever.

Here's a happy day scenario, when both messages make it to the topic:

[23:35:42] Handling session with ID: 77777777-0000-0000-0000-000000000000
[23:35:42] Got a message of type: PaymentAccepted for session with ID 77777777-0000-0000-0000-000000000000
[23:35:43] Scheduling a timeout to check in 00:00:05
[23:35:48] Got a message of type: Timeout for session with ID 77777777-0000-0000-0000-000000000000
[23:35:48] Scheduling a timeout to check in 00:00:05
[23:35:52] Got a message of type: Timeout for session with ID 77777777-0000-0000-0000-000000000000
[23:35:53] Scheduling a timeout to check in 00:00:05
[23:35:55] Got a message of type: ItemShipped for session with ID 77777777-0000-0000-0000-000000000000
[23:35:55] Orchestration with session ID 77777777-0000-0000-0000-000000000000 has successfully completed. Sending notification (TBD).
[23:35:57] Got a message of type: Timeout for session with ID 77777777-0000-0000-0000-000000000000
[23:35:57] Orchestration ID 77777777-0000-0000-0000-000000000000 has completed. Discarding timeout.
[23:36:13] Closing session with ID: 77777777-0000-0000-0000-000000000000

And this is what the execution looks like when one of the messages never arrives:

[01:15:16] Handling session with ID: 77777777-0000-0000-0000-000000000000
[01:15:16] Got a message of type: PaymentAccepted for session with ID 77777777-0000-0000-0000-000000000000
[01:15:16] Scheduling a timeout to check in 00:00:05
[01:15:21] Got a message of type: Timeout for session with ID 77777777-0000-0000-0000-000000000000
[01:15:21] Scheduling a timeout to check in 00:00:05
[01:15:26] Got a message of type: Timeout for session with ID 77777777-0000-0000-0000-000000000000
[01:15:26] Scheduling a timeout to check in 00:00:05
[01:15:31] Got a message of type: Timeout for session with ID 77777777-0000-0000-0000-000000000000
[01:15:31] Exhausted all retries (3). Executing compensating action and completing session with ID 77777777-0000-0000-0000-000000000000
[01:15:47] Closing session with ID: 77777777-0000-0000-0000-000000000000

Recap

Modelling a process that is executing over time requires persistence. With Azure Service Bus we can leverage Message Sessions to keep the state along with the session's messages, adding timeout messages to provide some future checkpoints to determine wherever the compensating logic needs to be executed or not. with the session state, we can also inspect the state of the saga by querying for it with the session ID and the correlation ID to be used.

Full solution is available on GitHub.

Fixing NServiceBus default databus serializer in .NET 6

$
0
0

Upgrading to .NET 6, updating all the packages, boosters turned on, launching testing.

Houston, we've got a problem.

System.NotSupportedException: BinaryFormatter serialization and deserialization are disabled within this application. See https://aka.ms/binaryformatter for more information.

Ouch! What just happened? There were no warnings, no obsolete messages, nothing on to the autopsy.

NServiceBus has a data bus (or a 'databus') feature. The feature implements the Claim Check pattern to allow messages to surpass the imposed maximum message size by the underlying messaging technology. The feature serializes the data internally, and the default DefaultDataBusSerializer uses BinaryFormatter. Nothing new; it has been used for years. Unfortunately, with .NET 5, BinaryFormatter was deprecated due to a security risk it poses. And while you could skip .NET 5 and live with .NET Core 3.1, .NET 6 is breathing down the neck, and an upgrade is imminent.

There is only one option:

  1. Re-enable the binary formatter🦨
  2. Work around the problem until Particular has an official solution

You read it right. Until an official fix, #2 is the only option that will be compliant with most environments.

The workaround can be summarized as the following:

  • Pick serialization
  • Replace the default data bus serializer with the custom version
  • Deploy

Picking serialization

I've chosen to go with BSON. The naive implementation is the following:

public class BsonDataBusSerializer : IDataBusSerializer
{
    public void Serialize(object databusProperty, Stream stream)
    {
        using var writer = CreateNonClosingStreamWriter(stream);
        using var bsonBinaryWriter = new BsonBinaryWriter(stream);
        BsonSerializer.Serialize(bsonBinaryWriter, databusProperty);
    }

    StreamWriter CreateNonClosingStreamWriter(Stream stream)
        => new(stream, Encoding.UTF8, bufferSize: 1024, leaveOpen: true);

    public object Deserialize(Stream stream)
    {
        using var bsonBinaryReader = new BsonBinaryReader(stream);
        return BsonSerializer.Deserialize<object>(bsonBinaryReader);
    }
}

Replacing the default data bus serializer

One of the things I wanted to avoid is sprinkling the code-base with the replacement code in various projects that use NServiceBus. So rather than going to the multiple places and having to register the workaround in the following way:

// TODO: required workaround for issue (link). Remove when fixed.
endpoint.AdvancedConfiguration.RegisterComponents(c => 
    c.RegisterSingleton<IDataBusSerializer>(new BsonDataBusSerializer()));

A perfect candidate would be using an auto-registered features feature. A feature could be a part of the Shared solution that all endpoints are using and would automatically replace the data bus serializer w/o any endpoints having to do anything in the configuration code.

internal class BsonDataBusSerializerFeature : Feature
{
    public BsonDataBusSerializerFeature()
    {
        DependsOn<NServiceBus.Features.DataBus>();

        EnableByDefault();
    }

    protected override void Setup(FeatureConfigurationContext context)
    {
        if (context.Container.HasComponent<IDataBusSerializer>())
        {
           // ???. Remove(defaultDataBusSerializer);
        }
        context.Container.ConfigureComponent<IDataBusSerializer>(_ => 
              new BsonDataBusSerializer(), DependencyLifecycle.SingleInstance);
    }
}

Except there's no way to achieve that with NServiceBus today. The IServiceCollection is adapted into NServiceBus ServiceCollectionAdapter, which doesn't provide a way to remove any previously registered services as one can do with a plain IServiceCollection. More details here.

Workaround for the workaround

This part might be a bit smelly, but it's the necessary evil. NServiceBus adapts IServiceCollection and keeps a reference as a private member field. With some reflection, we can get hold of the service collection and purge the default IDataBusSerializer implementation to ensure it's not registered and resolved first.

protected override void Setup(FeatureConfigurationContext context)
{
	if (context.Container.HasComponent<IDataBusSerializer>())
	{
		var serviceCollection = context.Container.GetFieldValue<IServiceCollection>("serviceCollection");

		if (serviceCollection is not null)
		{
			var defaultDataBusSerializer = serviceCollection.FirstOrDefault(descriptor =>
                       descriptor.ServiceType == typeof(IDataBusSerializer));

			if (defaultDataBusSerializer is not null)
			{
				serviceCollection.Remove(defaultDataBusSerializer);
			}
		}
	}

	context.Container.ConfigureComponent<IDataBusSerializer>(_ => 
             new BsonDataBusSerializer(), DependencyLifecycle.SingleInstance);
}

With a slight modification to the Setup method, the feature is now ready to be used!

Deploying

A word of caution for the solutions using one of these features in combination with data bus:

  • Events
  • Delayed messages

You will need to tread carefully. The migration is not a simple data bus serializer replacement in these scenarios. It has to cater to the fact that messages serialized with BinaryFormatter could be processed by the endpoints converted to use the new serialization. Subscribing to the issue on this topic is probably a safe bet. Or at least toss a few ideas before you start. And no matter what, good luck!

Updating Azure Functions Tools

$
0
0

Azure Functions Tools is at the heart of providing local development for Azure Function. Whenever you use Visual Studio, Rider, VS Code, or anything else, you need it to be able to run your bits. For command line folks, the installation process is outlined in the tools repository. For Visual Studio (2022) and Rider, it is less evident as it depends on the tool. So, where am I heading with this? Right, the need to update the Azure Functions Tools.

Normally, VS and Rider do it automatically. Azure Functions Tools feed (https://functionscdn.azureedge.net/public/cli-feed-v4.json) stored at %LocalAppData%\AzureFunctionsTools has a JSON feed file, feed-v<sequence-number>.json, that is periodically updated. This file points to all the necessary information, including the latest version for the version of the function (v4 in my case).

"v4": {"release": "4.20.0","releaseQuality": "GA","hidden": false
},

Release points at the Core Tools version

"coreTools": [
    {"OS": "Linux","Architecture": "x64","downloadLink": "https://functionscdn.azureedge.net/public/4.0.4704/Azure.Functions.Cli.linux-x64.4.0.4704.zip",
      //...
    },

When running your Functions project and noticing that the version is falling behind, there are a few things to check:

  1. The feed file. It could be that the feed is stale.
  2. The tooling in the IDE is not updating.

For #2, there's a difference between VS and Rider.

  • Rider will check for a newer version of Azure Functions Tools each time a project is loaded*
  • VS will check for a newer version when a new Functions project is created

*Rider also allows inspecting the version and manually replacing it with another version by going through Settings --> Tools --> Azure --> Functions and configuring Azure Functions Tools location.

Rider settings screenshot

With VS, it's not really intuitive. If I work on the same project and do not add new triggers or Funcitons projects to the solution, it can be very confusing. Rider does a better job, no doubt.

Running the same project before and after adding an additional Funcitons project just to update the tools.

Before:

before

After:

after

With this, the version of Tools can always be up-to-date.

Manually Completing Service Bus Messages with Functions

$
0
0

Message settlement with Azure Service Bus has undergone some changes over the past few iterations of the Service Bus SDK for .NET. In the latest SDK (Azure.Messaging.ServiceBus), the settlement is performed via the ServiceBusReceivedMessage. In the previous SDK, this was accomplished with the help of the MessageReceiver object.

Azure Functions In-Process SDK can disable message auto-completion by specifying AutoComplete = false on the ServiceBusTrigger. When auto-completion is disabled, the responsibility to complete (settle) the incoming message is on the function code. Except with the latest SDK, MessageReceiver is no longer an option. And while the equivalent, ServiceBusReceiver, seems to be the logical replacement, it is not. Instead, a particular type, ServiceBusMessageActions*, must be injected and used to settle messages.

And what about Isolated Worker SDK? Well, not there yet. Hopefully, it will be soon.

* will require Microsoft.Azure.WebJobs.Extensions.ServiceBus NuGet package to be added

Why Event Sourcing?

$
0
0

refill

Some context

I've seen software systems built since 2001. My first exposure was to classic ASP and VB6 applications with traditional state-based architecture. As someone new to software development, I was both fascinated by the use of data stores such as SQL Server to persist the vast amounts of data and horrified by the ease of irreversible mistakes that could take place. I should be honest; that took place when I accidentally ran some SQL update statements against the wrong database. Glorious days of a newbie developer at a startup company. I learned quickly that a safe strategy includes backing up data frequently.

Twenty years later, I realized it could have been a safe strategy. Still, it wasn't a good solution, to begin with, for a domain that involves business applications. So let's dig into the details.

State-based Application lie

I've been with a particular pharmacy for a long time. We moved a lot, and with each address change, the local pharmacy has always registered my new address and used that to confirm my identity each time I picked up a prescription. I had lived for over 5 years at the current address, so you can imagine my surprise when I failed the identity verification during a routine prescription pick-up. I'm older these days, but still not at the stage where I forget my address. So that was quite confusing.

When asked if I could provide a different address, I returned to the memory lane to the previous address. But, to my even bigger surprise, that wasn't the address on the file either. So I asked the pharmacist if they happened to store more than one address, trying the theory that the pharmacy system is not showing the default address. But no, the system only has a single address. So now I was really puzzled. But just for kicks, I gave it the address I had over 15 years ago. And bingo! My identity was confirmed. But let's unpack what has happened here.

The address in the system has changed. Obviously, somewhere in the pharmacy's system something changed my address from the current to the one I had over 15 years ago. But what was that event? Would it be possible to look at a log to determine what happened? If I file a complaint, would it be possible to find out what happened? And how did the dormant address for 15 years miraculously get resurrected, replacing my active address? A mystery surrounded by more guesses than answers.

Operating within the constraints

So how would a "mystery" of this sort get approached in a conventional system? Logs. Let's look into logs to see what has happened. That's assuming logs account for such a scenario and log the details. But it's virtually impossible to log absolutely every permutation in the system.

Track database changes! See if there's anything in the data. Well, that's not a trivial exercise, either. Assuming data changes are captured. And let's assume those data changes are captured; what's the context? What was the event that took place that caused the system to start using that 15yo address? Cricket.

What's a better approach?

This is the question I've been toying around for quite a while. My career has taken me from business applications to libraries and back. And it was the second round when I started questioning the state-based approach and the conventional architecture. This is where I got to return to the idea of Event Sourcing and re-evaluate the approach. If my data are the events that take place in the system, those events are the authoritative source of truth, not only allowing us to reconstruct the current state but also help understand how that state was derived. And that's a game changer.

I will save you from the details as plenty of more competent people wrote better posts on the topic. I'll just wrap up with my own experience highlight. Being able to trust the system and understand how it got to the place where it is is invaluable for business applications.

events

Great. How do I do it?

YMMV. I've started simple. No frameworks and no products. Just Azure Storage Tables to store my events, Azure Service Bus to communicate events for projections (async), and Azure MySQL Flex Server to keep projections for searches and queries. Knowing what I know today, I would probably do that again but choose slightly different services. Nothing works better than building your own to understand the concepts. If you need someone else to take over, consider a framework of some sort.

Azure Function: One Line of Insanity

$
0
0

Azure Functions Isolated Worker SDK is an easy-to-set-up and get-running framework. The minimal Progarm.cs is hard to mess up.

var host = new HostBuilder()
    .ConfigureFunctionsWorkerDefaults()
    .Build();

await host.RunAsync();

Right? Except when it's not. The extension method, ConfigureFunctionsWorkerDefaults is a critical piece of code that has to be invoked, or the generic host will start, but nothing will be wired up. When it's just a few lines, it's not hard to miss if the call is accidentally omitted. But it's less noticeable if that's an average Functions Application with several things configured, such as dependency services and configurations.

And that's the situation I found myself in. While performing code refactoring, I unintentionally deleted the invocation of ConfigureFunctionsWorkerDefaults. Surprisingly, there were no compilation errors or startup issues. However, an unexpected problem arose: binding a configuration file to one of my custom configuration classes failed. This raised eyebrows. When I examined the configuration providers, I immediately noticed that the environment variables provider was absent, which should have been included by default. At this point, I realized that I had accidentally eliminated the entire startup process of the Isolated Worker by inadvertently omitting that crucial extension method call.

Even more ironic is that I commented on a similar issue about six months ago. Same setup, same problem. And the suggestion I made back then would help me today - an analyzer that ensures ConfigureFunctionsWorkerDefaults is not removed accidentally.

Why do I still think that analyzer could be helpful? No one wants to remember special methods to be called. The point in the case is the class below.

class Demo
{
  public void Initialize() { // important initialization here }

  public void DoSomething() {}
}

To use d, it needs to be initialized.

var d = new Demo();
d.Initialize();
d.DoSomehting();

From the class itself, it is not apparent that Initialize() has to take place, and it is easy to omit the call. That's why DoSomething() is likely to validate if the initialization took place.

class Demo
{
  private bool initialized;
  public void Initialize()
  {
    // important initialization here 
    initialized = true;
  }
  private CheckWasInitialized()
  {
    if (initialized == false)
    {
      throw new Exception("Initialization did not occur. Call Initialize() first");
    }
  }

  public void DoSomething()
  {
    CheckWasInitialized();
    // logic
  }
}

Not the most elegant approach, but you get the idea. Trying to use an instance of Demo without going through initialization will cause an exception to be thrown.

However, achieving this goal using ConfigureFunctionsWorkerDefaults is currently not feasible. If the complete initialization of Azure Functions relies on this method, it would be desirable to implement a protective measure that guarantees its presence. One potential solution could involve utilizing a Roslyn analyzer to verify the method's existence. This might appear excessive at first glance, but this precaution could be worthwhile considering the potential consequences of removing a single line of code, which could bring down the entire function app without a clear indication of the issue. Currently, prioritizing stability and error prevention is paramount when compensation is no longer tied to the number of code lines produced.

Azure Blob Storage Cold Tier

$
0
0

Azure Storage service is the foundational building block in cloud architecture. Cheap, reliable, resilient, and powerful. From small solutions to monster systems, Blob service, in particular, is convenient. Any system that involves any type of document slowly but steadily has the number of blobs/files growing over time. Be it specific business requirements or legal aspects, blobs must be kept around for some time. But not all blobs are equal.

Blobs has had the concept of tiers for quite a while. Two tiers that are opposite extremes are Hot and Archive. The Hot tier is fast and inexpensive to access but more expensive to store. The Archive tier is inexpensive to store, but when it comes to reading and writing, let's say it's not a good idea. For a while, there was also the Cool tier. A middle ground if you wish. Blobs that might be accessed but very infrequently.

Recently, there's even more granularity when it comes to tiers. The Cold tier. The Cold tier is positioned between the Cool and Archive, adding more cost-effectiveness to storing blobs.

So how do you choose which tier is the right tear for the problem?

Understand the business needs. How blobs will be used. Plan accordingly. In many cases, blobs must be frequently accessed initially and then progress into the next, cooler tier, depending on the business rules. Microsoft recommended strategy is the following.

  • Cool tier: minimum retention of 30 days
  • Cold tier: minimum retention of 90 days
  • Archive tier: minimum retention of 180 days

This doesn't mean you absolutely must follow this recommendation. What if your blobs are stored and never accessed? Or stored and might be accessed at any time?

This is where Blob Lifecycle Management Policies are so handy. For example, let's say I'd like to reduce the cost of keeping blobs from day one but have the option to access those. I.e. not fully archived. The following policy would help with that by moving all blobs (including the existing ones) to the new Cold tier right away (some delay is expected as Storage service runs this not in real-time).

{"rules": [
    {"enabled": true,"name": "To-Cold","type": "Lifecycle","definition": {"actions": {"baseBlob": {"tierToCold": {"daysAfterModificationGreaterThan": 0
            }
          }
        },"filters": {"blobTypes": ["blockBlob"
          ],"prefixMatch": ["masters/"
          ]
        }
      }
    }
  ]
}

This will allow much lower storage costs. Remember, there will be higher access and transaction costs when blobs are accessed. The difference is that these blobs will be available immediately and not eventually, as they would be with the Archived tier.


Recoverability with Azure Functions

$
0
0

When working with Azure Service Bus triggers and Functions, the recoverability story is not the best with the out-of-box implementation. To understand the challenges with the built-in recoverability and how to overcome those, this post will dive into the built-in recoverability with Azure Functions for Service Bus queues and subscriptions, offering an alternative. But first, what is recoverability?

Recoverability in messaging refers to a messaging system's ability to ensure that messages are reliably delivered even in the presence of failures or disruptions. It involves message persistence, acknowledgments, message queues, redundancy, failover mechanisms, and retry strategies to guarantee message delivery and prevent data loss. This is vital for applications where message loss can have serious consequences.

With Azure Service Bus, recoverability is provided with MaxDeliveryCount and a dead-letter queue. To be more specific, a message is delivered at least MaxDeliveryCount time and, upon further failure, when re-delivered, will be moved to a special dead-letter sub-queue. Azure Functions leverage that feature to retry messages. However, there are a few issues with this approach.

  1. Retries are immediate
  2. Upon final failure, the dead-lettered message has no information to assist in troubleshooting.

Let's dive into those issues to see what can be done.

As part of processing a message, we must contact a 3rd part API. But, for some reason, despite the promised up-time of 99.9%, we hit an error. As a result of that error, the message processing will throw an exception, and the message will be re-delivered. It will be attempted as many times as the value of MaxDeliveryCount defined on the entity used to trigger the function. If it's set to 10, that would be 10 retries one after another. Or 10 immediate retries. That's not a small number of attempts. But if the problem persists, the message will be dead-lettered to allow the Function processing of other messages. Which is good. But when we need to understand what happened with the message at the time of the failure, we'll have a hard time. When a message is dead-lettered, the reason for dead-lettering will only contain the benign reason: the maximum delivery count has been exceeded. Not very helpful. Gladly, there are Application Insights and logged errors that could be correlated to the errors that have occurred and hopefully link between the dead-lettered message(s) and the logged exception(s). But wouldn't it be simpler to look at the message and know exactly the reason why it failed?

Thanks to the Isolated Worker SDK, we can do that. Similar to frameworks such as NServiceBus and MassTransit, we can enable recoverability with Azure Functions and make our prod-ops life easier. So, let's build that recoverability!

Centralized error queue

Unlike centralized dead-letter queue, a centralized error queue is an arbitrary queue that we'll add to the topology to store any messages that would typically go to the dead-letter sub-queue per entity. I.e. we won't allow MaxDeliveryCount executions for the message to be dead-lettered. Instead, we'll ensure we attempt a message no more than N times, moving it to the error queue afterwards. For the sake of the exercise, I'll use a queue called error.

Middleware

To implement recoverability, a Funcitons Isolated Worker SDK is required as it supports the concept of middleware (think pipeline). Below is a high-level implementation to elaborate on the approach. You'll need some package references, but the idea is what's important. We're getting closer!

public class Program
{
    public static void Main()
    {
        var host = new HostBuilder()
            .ConfigureFunctionsWorkerDefaults(builder =>
            {
                builder.UseWhen<ServiceBusMiddleware>(Is.ServiceBusTrigger); // Up-vote https://github.com/Azure/azure-functions-dotnet-worker/issues/1999 😉
            })
            .ConfigureServices((builder, services) =>
            {
                var serviceBusConnectionString = Environment.GetEnvironmentVariable("AzureServiceBus");
                if (string.IsNullOrEmpty(serviceBusConnectionString))
                {
                    throw new InvalidOperationException("Specify a valid AzureServiceBus connection string in the Azure Functions Settings or your local.settings.json file.");
                }

                // This can also be done with the AddAzureClients() API
                services.AddSingleton(new ServiceBusClient(serviceBusConnectionString));
            })
            .Build();

        host.Run();
    } 

The main focus is the ServiceBusMiddleware class, where the recoverability logic will be found. In a few words, we'll try to execute the functions, await next(context) call. If it throws, function invocation has failed and will be retried. Except we'll intercept that, and based on how many retries we allow, we'll decide wherever to rethrow or move the message to the centralized error queue. Note that we don't actually move the message. Instead, we clone it, complete the original message by swallowing the exception and sending the clone to the error queue. On top of that, we'll add the exception details to the cloned message to allow easier troubleshooting by inspecting the message headers. This will help the prod-ops to understand better why a message has failed by looking at the exception stack trace and exception details. Message payload, along with the error, can also be very helpful in solving the issue.

internal class ServiceBusMiddleware : IFunctionsWorkerMiddleware
{
    private readonly ILogger<ServiceBusMessage> logger;
    private readonly ServiceBusClient serviceBusClient;

    public ServiceBusMiddleware(ServiceBusClient serviceBusClient, ILogger<ServiceBusMessage> logger)
    {
        this.serviceBusClient = serviceBusClient;
        this.logger           = logger;
    }

    public async Task Invoke(FunctionContext context, FunctionExecutionDelegate next)
    {
        try
        {
            await next(context);
        }
        catch (AggregateException exception)
        {
            BindingMetadata meta = context.FunctionDefinition.InputBindings.FirstOrDefault(b => b.Value.Type == "serviceBusTrigger").Value;
            var input = await context.BindInputAsync<ServiceBusReceivedMessage>(meta);
            var message = input.Value ?? throw new Exception($"Failed to send message to error queue, message was null. Original exception: {exception.Message}", exception);

            if (message.DeliveryCount <= 5)
            {
                logger.LogDebug("Failed processing message {MessageId} after {Attempt} time, will retry", message.MessageId, message.DeliveryCount);

                throw;
            }

            // TODO: remove when fixed https://github.com/Azure/azure-functions-dotnet-worker/issues/993
            var specificException = GetSpecificException(exception);
            var failedMessage = message.CloneForError(context.FunctionDefinition.Name, specificException);
            var sender = serviceBusClient.CreateSenderFor(Endpoint.Error);
            await sender.SendMessageAsync(failedMessage);

            logger.LogError("Message ID {MessageId} failed processing and was moved to the error queue", message.MessageId);
        }
    }

    static Exception GetSpecificException(AggregateException exception) => exception.Flatten().InnerExceptions.FirstOrDefault()?.InnerException ?? exception;
}

What about Functions? That's the great part. Every Function triggered by Azure Service Bus messages will be covered. No more need to catch exceptions and handle those.

Result

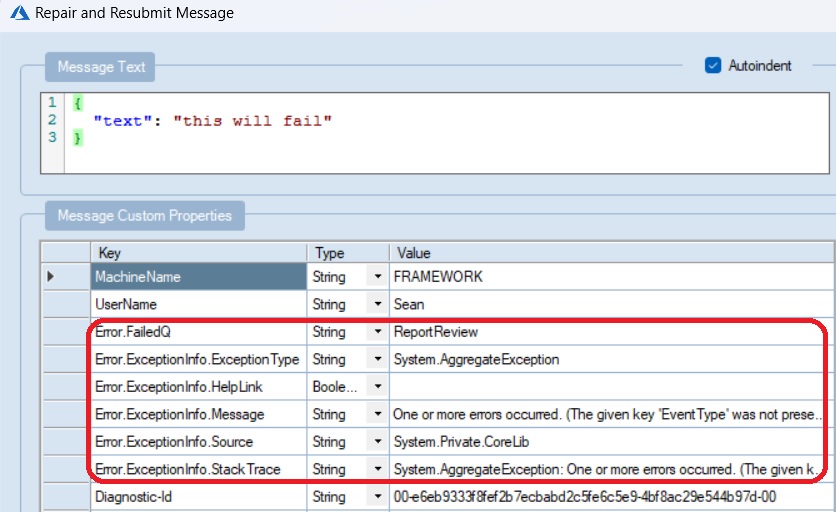
What does it look like in action? Sending a message that will continuously fail all 5 retries will cause the message to be "moved" into the error queue.

failed message

I've decided to provide the failed function name as Error.FailedQ to identify what queue/Function has failed. Stack trace and error message to have the details. Straightforward and very helpful when handling failed messages.

Back-off retries (delayed retries)

In the next post, we'll cover delayed retries to make recoverability even more robust.

Recoverability with Azure Functions - Delayed Retries

$
0
0

In the previous post, I showed how to implement basic recoverability with Azure Functions and Service Bus. In this post, I'm going to expand on the idea and demonstrate how to implement a back-off strategy.

Back-off strategy

A backoff strategy is intended to help with intermittent failures when immediate subsequent retries will suffice due to the required resources not being available within a short period but having a high probability of being back online after a short timeout. This is also known as delayed retries, when retries are attempted after a certain time (delay) to increase the chances of succeeding rather than bombarding with immediate retries and risking failing all the attempts within a short period.

Implementation

For delayed retries, we'll set an arbitrary number. Let's call it NumberOfDelayedRetries. The number could be hardcoded or taken from the configuration. The idea is to represent with this number how many delayed retry attempts there will be. Setting it to 0 would disable delayed retries altogether.

Delayed retries should kick in when the immediate retries are all exhausted. With Azure Service Bus, immediate retries are fairly simple to implement - Service Bus does that for us with the DeliveryCount on the given message. Unfortunately, today, there's no way to achieve the same with the native message. This will change in the future when there will be the ability to abandon a message with a custom timespan. Until then, some custom code will be required to mimic this behaviour.

Delayed retry logic

Whenever all immediate retries are exhausted, a message should go back to the queue and be delayed (scheduled) for a later time to be received. The problem with this approach is that we could exceed the MaxDeliveryCount that's there to protect from infinite processing. Sending back the same message also won't work due to the reason explained above (service limitation). So we'll cheat.

The incoming failing message will be cloned. And when cloned, we'll add a header, let's say "Error.DelayedRetries". And each time we want to increase the number of attempted delayed retries, we'll read the original incoming message's header and increase it by one for the cloned message. The first time, there will be no such header, so we need to account for that. As long as we need to proceed with the delayed retries, we'll be completing the original incoming message. That's why logging at this point is important.

public async Task Invoke(FunctionContext context, FunctionExecutionDelegate next)
{
	try
	{
		await next(context);
	}
	catch (AggregateException exception)
	{
		BindingMetadata meta = context.FunctionDefinition.InputBindings.FirstOrDefault(b => b.Value.Type == "serviceBusTrigger").Value;
		var input = await context.BindInputAsync<ServiceBusReceivedMessage>(meta);
		var message = input.Value ?? throw new Exception($"Failed to send message to error queue, message was null. Original exception: {exception.Message}", exception);

		if (message.DeliveryCount <= 5)
		{
			logger.LogDebug("Failed processing message {MessageId} after {Attempt} time, will retry", message.MessageId, message.DeliveryCount);

			throw;
		}
		
		#region Delayed Retries
		
		var retries = message.GetNumberOfAttemptedDelayedRetries();

		if (retries < NumberOfDelayedRetries)
		{
			var retriedMessage = message.CloneForDelayedRetry(retries + 1);

			await using var senderRetries = serviceBusClient.CreateSenderFor(Enum.Parse<Endpoint>(context.FunctionDefinition.Name));
			await senderRetries.ScheduleMessageAsync(retriedMessage, DateTimeOffset.UtcNow.Add(DelayedRetryBackoff));

			logger.LogWarning("Message ID {MessageId} failed all immediate retries. Will perform a delayed retry #{Attempt} in {Time}", message.MessageId, retries + 1, DelayedRetryBackoff);
			return;
		}
		#endregion

		// TODO: remove when fixed https://github.com/Azure/azure-functions-dotnet-worker/issues/993
		var specificException = GetSpecificException(exception);
		var failedMessage = message.CloneForError(context.FunctionDefinition.Name, specificException);
		var sender = serviceBusClient.CreateSenderFor(Endpoint.Error);
		await sender.SendMessageAsync(failedMessage);

		logger.LogError("Message ID {MessageId} failed processing and was moved to the error queue", message.MessageId);
	}
}

And that's all there is. The extension methods GetNumberOfAttemptedDelayedRetries() and CloneForDelayedRetry() are provided below for reference.

public static int GetNumberOfAttemptedDelayedRetries(this ServiceBusReceivedMessage message)
{
	message.ApplicationProperties.TryGetValue("Error.DelayedRetries", out object? delayedRetries);

	return delayedRetries is null ? 0 : (int)delayedRetries;
}

public static ServiceBusMessage CloneForDelayedRetry(this ServiceBusReceivedMessage message, int attemptedDelayedRetries)
{
	message.ApplicationProperties.TryGetValue("Error.OriginalMessageId", out var value);
	var originalMessageId = value is null ? message.MessageId : value.ToString();

	var error = new ServiceBusMessage(message)
	{
		ApplicationProperties =
		{
			["Error.DelayedRetries"]    = attemptedDelayedRetries,
			["Error.OriginalMessageId"] = originalMessageId
		},
		// TODO: remove when https://github.com/Azure/azure-sdk-for-net/issues/38875 is addressed
		TimeToLive = TimeSpan.MaxValue
	};

	return error;
}

Notice the "Error.OriginalMessageId" header. It is helpful to correlate the original Service Bus message to the delayed retried messages as those are physically different messages.

message

Et voilà! We've got ourselves a nice recoverability with immediate and delayed retries to help deal with intermittent errors and temporary failures.

Auditing

In the next post, I'll demonstrate how we can implement the audit trail of the successfully processed messages to complete the entire picture of all messages processed with Azure Functions.

Auditing with Azure Functions

$
0
0

In the previous two posts about recoverability, I focused on the rainy day scenarios where intermittent failures require retries and backoffs. This post will focus on the happy day scenario, where everything works as expected. So what's the issue then?

A successful message processing is not the only outcome that's required. More often than not there's also an audit trail that's requried. Imagine processing purchase orders. Not only you want to know nothing has failed. You might also want to have the confidence in a form of an audit trail that consists of those processed messages.

With Azure Functions Isolated Worker SDK, this becomes an extremely easy feature to implement. You could implement it as a standalone middleware but I chose to combine it with the revoverability middleware to keep the picture complete.

public async Task Invoke(FunctionContext context, FunctionExecutionDelegate next)
{
	try
	{
	    await next(context);

        await Audit(message, context);
	}
	catch (AggregateException exception)
	{
	    // Recoverability, omitted for clarity
	}
}

The implementation for auditing is just sending a message to the queue chosen to be the audit queue. Similar to the centralized error queue.

private async Task Audit(ServiceBusReceivedMessage message, FunctionContext context)
{
    var auditMessage = new ServiceBusMessage(message);

    auditMessage.ApplicationProperties["Endpoint"] = context.FunctionDefinition.Name;

    await using var serviceBusSender = serviceBusClient.CreateSender("audit");

    await serviceBusSender.SendMessageAsync(auditMessage);
}

Notice the custom header "Endpoint". This is intentional to keep track of the endpoint/function that has successfully processed the message that got audited. While there is additional that could be propagated with the audited message, this is enough for a basic audit trail.

Creating Azure Storage SFTP with Password using Bicep

$
0
0

Azure Storage service has a neat little option for hosting an SFTP. Doing so lets you upload your files as blobs to your Storage account. This is extremely helpful, especially when working on the decades-old system migrated to Azure but still requiring SFTP for data transfer. The documentation and setup of SFTP with a Storage account are straightforward—until you try to create the resource using Bicep and set the password as part of Bicep deployment. This is where it's getting a bit cumbersome.

TLDR: Setting the password when creating the Storage account and SFTP user using Bicep is impossible. The password has to be reset.

This means that OOTB Bicep can create an SFTP user but cannot set the password. The password needs to be reset, even if it hasn't been set yet, and the only way to do that is via the portal UI or scripting. The portal UI option is unacceptable if you're trying to automate your resource deployment. Which leaves the scripting option. Let's dive into the code.

param location string = resourceGroup().location

var sftpRootContainterName = 'sftp'
var sftpUserName = 'sftpuser'
var unique = uniqueString(resourceGroup().id)

resource storageAccount 'Microsoft.Storage/storageAccounts@2022-09-01' = {
  name: toLower('mysftp${unique}')
  location: location
  sku: {
    name: 'Standard_LRS'
  }
  kind: 'StorageV2'
  properties: {
    allowBlobPublicAccess: false
    allowCrossTenantReplication: false
    allowSharedKeyAccess: true
    isHnsEnabled: true
    isLocalUserEnabled: true
    isSftpEnabled: true
    isNfsV3Enabled: false
    minimumTlsVersion: 'TLS1_2'
    supportsHttpsTrafficOnly: true
  }
  tags: {}
}

resource blobServicesResource 'Microsoft.Storage/storageAccounts/blobServices@2022-09-01' = {
  parent: storageAccount
  name: 'default'
  properties: {
  }

  resource sftpStorageContainer 'containers' = {
    name: sftpRootContainterName
    properties: {
      publicAccess: 'None'
    }
  }
}

resource sftpLocalUserResource 'Microsoft.Storage/storageAccounts/localUsers@2023-05-01' = {
  name: sftpUserName 
  parent: storageAccount
  properties: {
    permissionScopes: [
      {
        permissions: 'rcwdl'
        service: 'blob'
        resourceName: sftpRootContainterName
      }
    ]
    homeDirectory: '${sftpRootContainterName}/' // This user will have complete control over the "root" directory in sftpRootContainterName
    hasSharedKey: false
  }
}

// Managed identity necessary to execute the scirpt
resource storageAccountManagedIdentity 'Microsoft.ManagedIdentity/userAssignedIdentities@2023-01-31' existing = {
  name: 'mi-sandbox-sean-feldman'
  scope: resourceGroup()
}

// The script to reset the password
resource deploymentScript 'Microsoft.Resources/deploymentScripts@2023-08-01'= {
  name: 'mysftp-inlineCLI-${unique}'
  location: location
  kind: 'AzureCLI'
  identity: {
    type: 'UserAssigned'
    userAssignedIdentities: {
      '${storageAccountManagedIdentity.id}': {}
    }
  }
  properties: {
    azCliVersion: '2.63.0'
    arguments: '${storageAccount.name} ${resourceGroup().name} ${sftpUserName}'
    scriptContent: '''
      az storage account local-user regenerate-password --account-name $1 -g $2 -n $3
    '''
    timeout: 'PT5M'                 // Set timeout for the script execution (optional)
    cleanupPreference: 'OnSuccess'  // Automatically clean up after success
    retentionInterval: 'PT1H'       // Retain script resources for 1 hour after execution
  }
}

// DO NOT do this in production
output text string = deploymentScript.properties.outputs.sshPassword

The solution is to deploy and run the deploymentScript AZ CLI script to reset the password. The output of the az storage account local-user regenerate-password is the generated password, the output object of the script resource, as the sshPassword. But this is not ideal for production. For production, keeping the password in Azure KeyVault or Azure Config Service is better. With a twist, testing if the value exists first and setting it only if it doesn't is better.

DateTime to String with Custom Formatting

$
0
0

When formatting DateTime to a string, the format specifier provides access to the parts of the date and time we want to express as a string. E.g.

DateTime.UtcNow.ToString("yyyy-MM-dd HH:mm:ss.fff")

will produce something like 2024-11-03 12:34:56.789. But, you must be extra careful with the time separator :. It's not always the same for all cultures, and if an explicit culture is not specified, the default local culture might surprise you. Let's see an example.

Let's say the code is running on a machine set up with Finish culture.

DateTime.UtcNow.ToString("yyyy-MM-dd HH:mm:ss.fff", new CultureInfo("fi-FI")).Dump();

The same code snippet used earlier produces an entirely different result, 2024-11-03 12.34.56.789. But how is that possible? That's because the : custom format specifier is culture-specific. The separator character must be specified within a literal string delimiter to change the time separator for a particular date and time string.

DateTime.UtcNow.ToString("yyyy-MM-dd HH':'mm':'ss.fff")

Or escaped.

DateTime.UtcNow.ToString("yyyy-MM-dd HH\\:mm\\:ss.fff")

Escaping would be required to avoid surprises if date formatting yyyy/MM/dd is needed. Find more about date and time separator specifiers on MSDN.


<script src="https://jsc.adskeeper.com/r/s/rssing.com.1596347.js" async> </script>